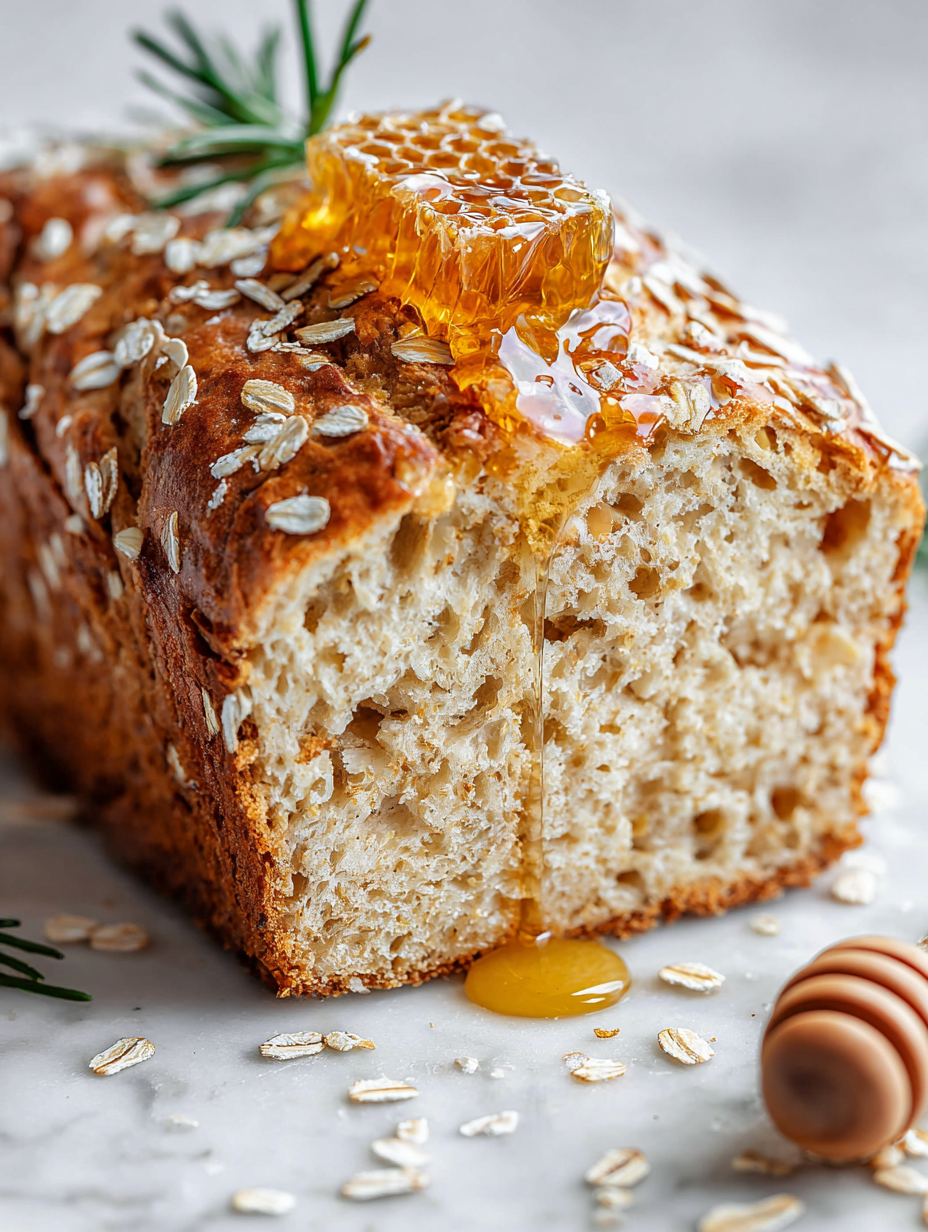
Honey and oats might seem like an unlikely duo in bread baking, but together they create a loaf that’s unexpectedly versatile. The honey lends a gentle sweetness and a hint of floral aroma, while the oats add a rustic, hearty texture that keeps the bread feeling grounded and satisfying. It’s a simple recipe, but one that rewards you with a crust that’s just a little chewy and a crumb that’s soft yet substantial.
This bread is my go-to for those mornings when I want something nourishing but not overly sweet. It’s also surprisingly good for dinner—toast it with a smear of butter or a slice of cheese, and it’s like a whole new dish. I love how the honey’s subtle sweetness balances the earthiness of the oats, making it a bread that feels both cozy and refined, perfect for any time of day.
Focusing on how honey and oats create a bread that balances rustic heartiness with subtle sweetness, making it unexpectedly versatile for both breakfast and dinner tables.
Rustic sweetness in every slice
- Baking this bread always takes me back to my grandma’s kitchen, where the smell of honey and oats filled the air on chilly mornings.
- There’s a quiet pride I feel when I pull a perfectly golden loaf from the oven, knowing I made it from scratch.
- I love how the subtle sweetness of honey makes this bread feel like a treat, even on the busiest weekdays.
- Sometimes I get a little chaotic in the kitchen, but this recipe always comes together no matter what—trusty and forgiving.
- Sharing slices of this bread with friends feels like passing along a small piece of comfort, especially on cozy weekend mornings.
The story behind this recipe
- This recipe actually started from a rainy weekend when I was craving something warm and wholesome but didn’t want to fuss with complicated ingredients. I remembered my grandmother’s simple oat bread, and how the honey in her kitchen would make everything smell like a gentle summer morning. I experimented with adding more honey to bring out that floral sweetness and used oats not just inside but as a topping for a rustic finish. The result was a loaf that felt like a hug—familiar yet special enough for any breakfast or snack run.
- Every time I bake this, it takes me back to those slow, cozy weekends of childhood. I love that I can tweak the sweetness or oats and still get a loaf that’s reliably satisfying. It’s one of those recipes I turn to when I want something nourishing but not overly fancy, just honest bread with a bit of charm.
- heading
- story_type
Trivia and historical notes
- Honey oat bread has roots in rural European baking traditions, where oats were a staple grain and honey a natural sweetener.
- During the Great Depression, resourceful bakers used oats and honey to stretch ingredients and add flavor without extra cost.
- Oats have been cultivated for thousands of years, originally in Central Europe, valued for their hearty, filling qualities.
- The combination of honey and oats became popular in American baking in the early 20th century, emphasizing wholesome, nourishing bread options.
- Quirky fact: Ancient Scandinavian cultures used honey and oats in bread for special celebrations, believing it brought good luck and health.
Ingredient breakdown: key components
- Honey: I love how honey brings a gentle floral sweetness and a sticky, oozy texture that makes the bread subtly fragrant. If you prefer less sweetness, cut the honey by a tablespoon or two, but don’t skip it—trust me, it’s the flavor anchor.
- Oats: Rolled oats add that rustic chew and nutty aroma that makes each slice feel hearty. Use quick oats if you’re in a pinch, but the texture won’t be quite as chewy and satisfying. Toast your oats lightly before mixing for extra flavor.
- Bread flour: I always go with bread flour for the best gluten structure—chewy crust, tender crumb. Whole wheat or spelt can substitute, but reduce hydration slightly—your dough might feel a tad drier but still deliciously wholesome.
- Yeast: Active dry yeast is my go-to because it’s reliable. Fresh yeast works too but needs a different proofing. Make sure it’s fresh; stale yeast won’t give you that rise you need for a fluffy loaf.
- Salt: I add just enough to balance the sweetness and enhance flavor. Don’t skip salt—it’s the secret to making the honey and oats shine without tasting bland. Use sea salt for a cleaner finish.
- Water: Lukewarm water (around 38°C/100°F) helps activate the yeast. If your water is too hot, it’ll kill the yeast. Too cold, and the dough won’t rise well. Feel the warmth—it should be cozy, not hot.
- Butter (optional): A little melted butter brushed on the crust before baking gives a lovely sheen and a touch of richness. Skip for a vegan version, but consider a splash of olive oil for moisture and flavor.
Spotlight on key ingredients
Honey:
- I love how honey adds a sticky, floral sweetness that makes the bread smell like a warm spring morning. If you want less sweetness, cut back, but don’t skip it—it’s the flavor anchor.
- Oats: Rolled oats give that rustic chew and nutty aroma. Toast them lightly before mixing for a deeper, toasted flavor. Use quick oats if you’re in a rush, but the texture won’t be quite as hearty.
Oats:
- Whole rolled oats provide a hearty, chewy texture that keeps each slice feeling substantial. Toast them beforehand for a richer, nutty aroma that hits the nose as you slice.
- They behave differently: during baking, oats soak up moisture and soften, adding a rustic, chewy bite. Keep an eye on the crust—oats can add a bit of a toasty edge if baked too long.
Notes for ingredient swaps
- Honey-Free: Swap honey for agave syrup or maple syrup for similar sweetness and moisture, but expect a slightly different floral note.
- Gluten-Free: Use a gluten-free bread flour blend plus xanthan gum; the texture will be a bit denser, but still satisfying.
- Dairy-Free: Omit butter or replace with coconut oil or olive oil; expect a slightly different flavor and softer crust.
- Vegan: Use maple syrup instead of honey and plant-based butter or oil; the loaf will have a subtle plant-based aroma and softer crumb.
- Oats: Ground oats into oat flour for an even finer crumb or skip oats entirely for a softer, more traditional white bread feel.
- Sweetener: Reduce honey by half or skip altogether for a less sweet loaf, perfect for savory toppings or breakfast sandwiches.
- Water: Use sparkling water to add lightness or replace with milk (dairy or plant-based) for richer flavor and softer crumb.
Equipment & Tools
- Large mixing bowl: To combine ingredients and let the dough rise.
- Measuring cups and spoons: Precisely measure ingredients for consistency.
- Wooden spoon or dough scraper: Mix and shape the dough.
- Loaf pan: Shape and support the bread during final proof and baking.
- Kitchen towel or plastic wrap: Cover dough during rising to retain moisture.
- Oven: Bake the bread at a consistent temperature.
- Cooling rack: Allow the bread to cool evenly and prevent sogginess.
Step-by-step guide to Honey Oat Bread
- Gather ingredients: bread flour, rolled oats, honey, active dry yeast, salt, warm water (about 38°C/100°F), and optional melted butter. Have a loaf pan ready.
- Activate yeast: In a small bowl, dissolve 2 teaspoons yeast in 1/4 cup warm water. Let sit for 5 minutes until frothy and bubbling. If not frothy, discard and start again.
- Mix dry ingredients: In a large bowl, combine 3 cups bread flour, 1 cup rolled oats, and 1 teaspoon salt. Stir to evenly distribute.
- Add wet ingredients: Make a well in the center. Pour in the activated yeast mixture, 1/4 cup honey, and 2 tablespoons melted butter if using. Mix until a shaggy dough forms.
- Knead the dough: Turn out onto a floured surface. Knead for about 8-10 minutes until smooth, elastic, and slightly tacky. Add a sprinkle of flour if too sticky, or a splash of water if too dry.
- First rise: Place dough in a lightly oiled bowl. Cover with a damp towel or plastic wrap. Let rise in a warm spot for 1 to 1.5 hours, until doubled in size and puffed up.
- Shape the loaf: Punch down the dough gently. Turn out onto a floured surface. Shape into a tight oval or rectangle fitting your loaf pan. Place in the pan, seam side down.
- Second rise: Cover loosely and let rise for another 30-45 minutes, until the dough just reaches the top of the pan and looks airy.
- Preheat oven: Set to 190°C/375°F. Place a rack in the middle. Optionally, place a baking stone or an oven-safe dish with water on the lower rack for steam.
- Bake the bread: Bake for 30-35 minutes. The crust should turn deep golden brown, and the loaf should sound hollow when tapped. If it darkens too quickly, tent with foil.
- Cool and finish: Remove from oven, transfer to a wire rack. Brush with a little melted butter if desired. Let cool for at least 15 minutes before slicing.
- Slice and enjoy: The bread should have a chewy crust, a fragrant honey aroma, and a moist, hearty crumb with oats visible throughout.
Let the bread cool in the pan for 10 minutes, then transfer to a wire rack. Allow to cool completely before slicing to set the crumb and prevent squishing. Serve warm or at room temperature.
How to Know It’s Done
- Crust is deep golden and firm to the touch.
- Loaf sounds hollow when tapped on the bottom.
- Internal temperature reaches 93°C/200°F for thorough baking.
Honey Oat Bread
Ingredients
Equipment
Method
- Dissolve active dry yeast in warm water and let sit for 5 minutes until frothy and bubbling, indicating it’s active.
- In a large mixing bowl, combine bread flour, toasted oats, and salt. Stir to evenly distribute the dry ingredients.
- Pour the activated yeast mixture into the dry ingredients along with honey and melted butter if using. Mix with a wooden spoon until a shaggy dough forms.
- Turn the dough out onto a floured surface and knead for about 8-10 minutes until smooth, elastic, and slightly tacky. You should hear a slight stretch in the dough as you knead.
- Place the kneaded dough into a lightly oiled bowl, cover with a damp towel or plastic wrap, and let it rise in a warm spot for 1 to 1.5 hours until doubled in size and puffed up.
- Gently punch down the risen dough to release excess air, then shape it into a loaf that fits your prepared loaf pan. Place the shaped dough seam-side down in the pan.
- Cover the loaf loosely and allow it to rise again for 30 to 45 minutes, until it just reaches the top of the pan and looks airy.
- Preheat your oven to 190°C/375°F. Once ready, place the loaf in the oven and bake for 30-35 minutes until the crust is deep golden brown and the loaf sounds hollow when tapped.
- Remove the bread from the oven, brush with melted butter if desired, and transfer to a cooling rack. Let it cool for at least 15 minutes to set the crumb.
- Slice the bread once cooled and enjoy the hearty, fragrant slices with butter, cheese, or your favorite toppings.
Pro tips for perfect honey oat bread
- Use a slightly wetter dough for a softer, more open crumb that’s easy to slice.
- Toast oats lightly before mixing to amplify their nutty aroma and add depth to the flavor.
- Incorporate honey into the warm water to ensure it dissolves fully and infuses the dough evenly.
- Knead until the dough is smooth and elastic—about 8 minutes—so the gluten develops fully for good rise.
- For a glossy crust, brush the loaf with melted butter or egg wash right after baking for extra shine.
- Check your oven temperature with an oven thermometer—hot spots can cause uneven browning or underbaking.
- To test doneness, tap the bottom of the loaf—if it sounds hollow, it’s ready to come out of the oven.
Common mistakes and how to fix them
- FORGOT to adjust hydration when substituting flours? Add water gradually to reach the right dough consistency.
- DUMPED too much flour during kneading? Lighten the dough with a splash of water and knead again gently.
- OVER-TORCHED the crust? Cover the loaf loosely with foil if it browns too quickly in the oven.
- UNDER-BAKED? Extend baking time by 5-10 minutes and check for a hollow sound when tapped.
Quick fixes and pantry swaps
- When dough is too sticky, splash in a little more flour and knead briefly.
- If bread isn’t rising well, splash warm water on the yeast and wait five minutes.
- When crust over-browns, shield with foil and lower oven temperature slightly.
- Splash a little water in the oven for steam if the crust isn’t crisp enough.
- Patch a collapsed loaf by slicing and toasting for croutons or bread pudding.
Prep, store, and reheat tips
- Prepare the dough up to the first rise; refrigerate overnight for a slow, flavor-developing fermentation that enhances the bread’s complexity.
- Wrap cooled slices tightly in plastic wrap or store in an airtight container; they’ll stay fresh for about 2 days at room temperature, developing a slightly softer crust.
- Freeze the fully baked loaf or slices for up to 3 months; reheat directly from frozen, wrapped in foil, at 180°C/350°F for 10-15 minutes until warm and fragrant.
- Reheating tips: Warm slices in a toaster or oven—look for that gentle crackle and aroma of toasted oats and honey—avoiding microwave drying out the crumb.
Common questions about Honey Oat Bread
1. Can I substitute honey with syrup?
Use honey at room temperature for easier mixing and to prevent crystallization during baking.
2. Can I use quick oats instead of rolled oats?
Yes, maple syrup or agave work; expect a slightly different floral or caramel note, but still delicious.
3. What if my dough is too sticky?
Absolutely, but quick oats will create a softer, less chewy texture; for best results, stick with rolled oats.
4. My bread didn’t rise enough—what went wrong?
Add a little more flour, a tablespoon at a time, until the dough is manageable but not dry.
5. How do I know when the bread is fully baked?
Ensure your yeast is fresh and water is warm enough (around 38°C/100°F); yeast needs warmth to activate.
6. Can I skip the second rise?
Tap the bottom of the loaf; it should sound hollow and the crust should be deep golden brown.
7. How long does the bread stay fresh?
For a softer crust, brush with melted butter right after baking and cover loosely with a towel until cooled.
8. Can I freeze the dough before baking?
Store at room temperature in an airtight container for up to 2 days or freeze slices for longer storage.
9. What flavor notes should I expect from this bread?
Yes, shape the dough, freeze in a sealed bag, then thaw and proof before baking for fresh bread anytime.
10. Why does my bread have a dense crumb?
A gentle floral sweetness from honey, nutty aroma from oats, and a hearty, chewy crumb.
Baking this honey oat bread always feels like a small act of kindness—warm, fragrant, and satisfying in every bite. It’s the kind of loaf that makes you pause and really taste the simple magic of good ingredients coming together. Sometimes, it’s just about that quiet moment of pulling a fresh loaf from the oven and knowing you made something nourishing from scratch.
In a world that moves fast, this bread reminds me to slow down and enjoy the process—measuring, mixing, waiting. It’s a humble recipe, but one that feels like a small victory each time, especially when shared with someone who appreciates honest, homemade bread.

Hi, I’m Ava Bennett. Welcome to Glowing With Pride. I’m Ava Bennett, a professional chef, recipe developer, and lifelong believer that food is one of the most powerful ways we express love, identity, and joy. This space was created from years of working in professional kitchens, countless late nights behind the line, and a deep desire to share food in a way that feels personal, proud, and purposeful. Cooking has never just been my career. It has been my language.


Leave a Reply