There’s something almost magical about how overripe bananas, with their dark, sweet-smelling skins, turn into the secret weapon in this bread. It’s like they’ve outlived their prime but have still got plenty of flavor to give. I’ve always kept a stash in the freezer for moments when I need a quick, no-fuss snack, and this bread is a perfect way to use them up.
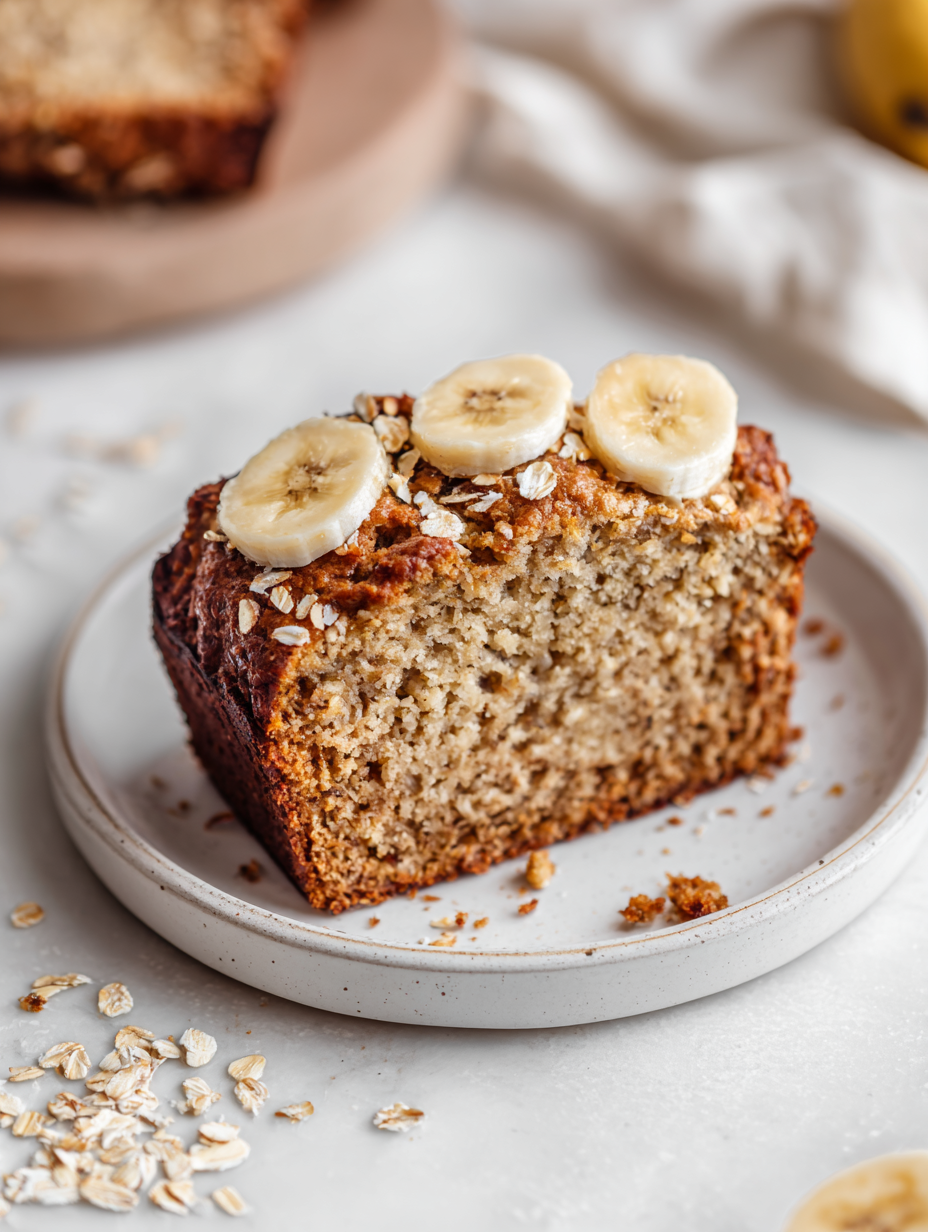
Baking with bananas that are past their prime feels honest—no need for fancy ingredients or complicated techniques. Just mash them up, toss in some oats, and let the oven do its thing. The result is a moist, dense loaf that smells like warm banana and toasted oats, a humble treat that somehow feels a little special every time.
Focusing on how overripe bananas become the secret ingredient that transforms this bread into a moist, flavorful treat that feels like a cozy kitchen secret.
A Cozy, Overripe Banana Secret
- There’s a quiet joy in turning overripe bananas into something warm and inviting—like reclaiming their sweetness in every slice.
- I remember the first time I baked this bread on a rainy Sunday; the smell of oats and bananas filled the house, easing the chaos outside.
- Using overripe bananas feels like a small act of defiance against waste, turning something discarded into a comforting, hearty treat.
- This recipe reminds me of mornings spent in my grandmother’s kitchen, where simple ingredients come together with love and a pinch of nostalgia.
- Baking this bread always feels like a small victory—a way to slow down and savor a moment in a busy day.
A Cozy, Overripe Banana Secret
- This recipe was born out of a need to use up a mountain of overripe bananas that were about to go to waste. Instead of tossing them, I mashed them into bread, and suddenly, that over-the-top sweetness and soft texture became a comforting staple in my kitchen. It’s funny how a little bit of chaos—overripe fruit—can lead to something so simple yet satisfying.
- Baking this bread became a way to hold onto those fleeting, ripe banana moments, especially when I’d forget about them in the fruit bowl. The smell of toasted oats and caramelized banana as it bakes never fails to remind me that sometimes, the best ideas come from leftovers and a bit of improvisation.
- heading: ‘A Cozy, Overripe Banana Secret
Contextual origin, trivia, or history
- Banana bread originated in the United States during the 1930s, often linked to the rise of home baking and resourcefulness during the Great Depression.
- Overripe bananas became a popular ingredient because they are sweeter and mash easily, making baking more accessible and forgiving.
- In some cultures, banana-based baked goods have long been staples, with variations found in Caribbean, African, and Southeast Asian cuisines.
- The idea of using overripe bananas in bread was likely born out of necessity, turning a waste product into a delicious, economical treat.
- Today, banana oat bread is appreciated for its wholesome flavor, combining the natural sweetness of bananas with hearty oats, making it a nutritious comfort food.
Ingredient breakdown: key components
- Bananas: I love how overripe bananas develop a deep, sweet aroma—like caramel and tropical fruit combined. Use them when they’re dark and oozy for the best flavor, but if you’re in a pinch, just mash any ripe banana, even if it’s slightly firmer.
- Oats: I prefer old-fashioned rolled oats—they give a nice chewy bite and a nutty aroma during baking. If you’re gluten-free, swap in certified gluten-free oats, but expect a slightly different texture that’s a little more delicate.
- Flour: I usually reach for all-purpose, but whole wheat flour adds a hearty note. If you want a lighter crumb, use half white and half whole wheat. Skip the cake flour if you want more structure—regular all-purpose is fine.
- Sweetener: Brown sugar brings a molasses hint that complements the bananas. If you want to cut sweetness, substitute with maple syrup or honey, but reduce the liquid slightly to keep the batter from becoming too wet.
- Eggs: They act as the binder and give some lift. For a vegan version, try flax eggs—mix 1 tablespoon ground flaxseed with 3 tablespoons water until thick and gelatinous. It won’t rise quite as much but still works.
- Oil or Butter: I use neutral-tasting oil like canola or vegetable for moisture. If you prefer butter, it adds richness and a slightly toasty flavor—just melt and cool before mixing. For a dairy-free version, coconut oil is a good swap, but it adds a subtle coconut aroma.
- Vanilla: A splash of vanilla extract enhances the overall warmth of the bread. Skip it if you’re out, but it really helps round out the flavors—consider a pinch of cinnamon or nutmeg if you want more depth.
Spotlight on key ingredients
Bananas:
- I love how overripe bananas develop a deep, sweet aroma—like caramel and tropical fruit combined. Use them when they’re dark and oozy for the best flavor, but if you’re in a pinch, just mash any ripe banana, even if it’s slightly firmer.
- Oats: I prefer old-fashioned rolled oats—they give a nice chewy bite and a nutty aroma during baking. If you’re gluten-free, swap in certified gluten-free oats, but expect a slightly different texture that’s a little more delicate.
Oats:
- They bring a hearty chew and a toasty scent that intensifies as they bake, creating a cozy aroma around the house. If you prefer a finer crumb, roll them a little more or pulse briefly in a food processor, but don’t overdo it—coarse oats give the best texture.
- ingredient
Notes for ingredient swaps
- Dairy-Free: Use coconut oil instead of butter for moisture, which adds a subtle coconut aroma but keeps it dairy-free.
- Gluten-Free: Swap all-purpose flour with a 1:1 gluten-free blend; expect a slightly denser crumb but similar flavor.
- Sweetener: Replace brown sugar with maple syrup or honey for a more caramelized, richer flavor, but reduce liquids slightly.
- Eggs: Use flax eggs (1 tbsp ground flaxseed + 3 tbsp water) for a vegan option; the texture stays moist, though less rise.
- Oats: Substitute steel-cut oats if you prefer a coarser texture; they will take a bit longer to cook and soften.
- Bananas: Slightly underripe bananas work if overripe aren’t available, but expect a less intense sweetness.
- Oil: Swap neutral oil with melted butter or coconut oil to alter richness and aroma subtly.
Equipment & Tools
- Loaf pan: Holds the batter during baking for even shape and size.
- Mixing bowls: Combine wet and dry ingredients separately for a smooth batter.
- Silicone spatula: Fold ingredients gently without deflating the batter.
- Toothpick or cake tester: Check doneness of the baked bread.
- Cooling rack: Allow bread to cool evenly and prevent sogginess.
Step-by-step guide to Banana Oat Bread
- Preheat your oven to 180°C (350°F). Grease a 9×5 inch loaf pan or line it with parchment paper for easy removal.
- In a large bowl, mash 3 ripe bananas until smooth. The more brown and oozy, the better for flavor.
- Add 1/3 cup oil or melted butter, 1/2 cup brown sugar, and 1 teaspoon vanilla extract. Mix until well combined and the mixture is slightly fluffy.
- In a separate bowl, whisk together 1 cup rolled oats, 1 1/2 cups all-purpose flour, 1 teaspoon baking powder, and a pinch of salt.
- Gradually pour the dry ingredients into the banana mixture, folding gently. Do not overmix; just combine until there are no streaks.
- If the batter seems thick, stir in a splash of milk or water—just enough to loosen it slightly. It should be scoopable but not runny.
- Pour the batter into the prepared loaf pan. Smooth the top with the back of a spoon or spatula.
- Bake for 45-50 minutes. Check after 45; the top should be golden brown, and a toothpick inserted into the center should come out clean.
- If the top browns too quickly before the center is set, tent with foil and continue baking.
- Once baked, remove from oven and let cool in the pan for 10 minutes. Then transfer to a wire rack to cool completely.
- Rest the bread for at least 15 minutes before slicing. It’s best enjoyed slightly warm or at room temperature.
Let the bread rest for 15 minutes in the pan before transferring to a wire rack. Slice with a serrated knife. Serve warm or at room temperature for best flavor and texture.
How to Know It’s Done
- The top is golden and firm to touch.
- A toothpick inserted in the center comes out clean.
- The loaf feels springy but holds its shape when lightly pressed.
Overripe Banana Oat Bread
Ingredients
Equipment
Method
- Preheat your oven to 350°F (180°C) and grease a 9×5 inch loaf pan or line it with parchment paper.
- Peel the ripe bananas and mash them thoroughly in a large bowl until smooth, with some slight lumps for texture.
- Add the oil or melted butter, brown sugar, and vanilla extract to the mashed bananas. Mix with a spatula until the mixture is well combined and slightly fluffy.
- In a separate bowl, whisk together the rolled oats, flour, baking powder, and salt.
- Gradually add the dry ingredients to the banana mixture, folding gently with a spatula until just combined. Be careful not to overmix.
- If the batter feels very thick, stir in a splash of milk or water to loosen it slightly, aiming for a scoopable but not runny consistency.
- Pour the batter into the prepared loaf pan, smoothing the top with the spatula until even.
- Bake in the preheated oven for 45-50 minutes, or until the top is golden brown and a toothpick inserted into the center comes out clean.
- If the top darkens too quickly, tent the loaf with foil and continue baking. Check doneness with a toothpick near the end of baking time.
- Remove the bread from the oven and let it cool in the pan for 10 minutes, then transfer to a wire rack to cool completely.
- Slice the cooled bread with a serrated knife, and enjoy it warm or at room temperature for a cozy treat.
Pro tips for perfect banana oat bread
- Use ripe bananas with deep, oozy skins for maximum flavor and moisture.
- Toast the oats lightly before mixing for a warm, nutty aroma that enhances the bread’s depth.
- Mix wet and dry ingredients separately; don’t overmix to keep the bread tender and airy.
- Check for doneness by inserting a toothpick—if it comes out clean, you’re set.
- If the top browns too quickly, tent the loaf with foil to prevent burning while the inside finishes.
- Let the bread cool for at least 15 minutes before slicing to avoid squishy, crumbly slices.
- For a softer crust, brush with a little melted butter or honey while still warm.
Common mistakes and how to fix them
- FORGOT to check oven temperature → Use an oven thermometer for accuracy.
- DUMPED in all ingredients at once → Mix dry and wet separately, then combine gently.
- OVER-TORCHED the bread → Cover loosely with foil if browning too fast, adjust oven rack.
- MISSED cooling time → Let bread cool at least 15 minutes for texture to set properly.
Quick fixes and pantry swaps
- When batter appears too thick → Splash in a little milk to loosen it.
- If loaf cracks on top → Cover with foil and lower oven temperature slightly.
- When bread is underbaked → Extend baking time by 5-minute intervals.
- Dumped in too much sugar → Reduce sugar next time for a less sweet bread.
- When smell of burning oats → Lower oven heat or move pan to a lower rack.
Prep, store, and reheat tips
- Prep the bananas by mashing them thoroughly; they can be stored in an airtight container in the fridge for up to 24 hours before mixing.
- The baked bread keeps well in an airtight container at room temperature for up to 2 days; for longer storage, refrigerate for up to a week or freeze slices for 1-2 months.
- To reheat, warm slices in the microwave for 15-20 seconds until just heated through—expect a soft, moist texture with a warm banana aroma.
- For best flavor, toast frozen slices directly from the freezer; the toasty aroma enhances the oats’ nuttiness, and the crust crisps nicely.
Top questions about Banana Oat Bread
1. How do I choose the best bananas for this bread?
Overripe bananas develop a deep, sweet aroma and soft, oozy texture that infuse the bread with rich flavor. Use bananas that are dark brown and very soft for the best results.
2. Can I substitute the oats with something else?
Use old-fashioned rolled oats for chewy texture and nutty aroma. If you need gluten-free, opt for certified gluten-free oats, but expect a slightly more delicate crumb.
3. Can I prepare the bananas ahead of time?
Yes, mashed bananas can be stored in an airtight container in the fridge for up to 24 hours before mixing. Just mash thoroughly to keep the batter moist and flavorful.
4. How do I know when the bread is done?
Bake the bread until the top is golden and a toothpick inserted into the center comes out clean. Let it cool for at least 15 minutes before slicing for the best texture.
5. Can I make this bread dairy-free or gluten-free?
To keep it dairy-free, swap butter for coconut oil. For gluten-free, use a 1:1 gluten-free flour blend. Adjust sweetness with maple syrup or honey if desired.
6. What’s the best way to mix the ingredients?
Overmixing can make the bread dense. Mix wet and dry ingredients separately, then fold gently just until combined. Don’t overwork the batter.
7. How do I prevent over-browning?
If the bread browns too quickly, tent it loosely with foil and lower the oven temperature slightly. Always check for doneness with a toothpick to avoid underbaking.
8. How should I store and reheat leftovers?
Store leftover bread in an airtight container at room temperature for 2 days or refrigerate for up to a week. To reheat, warm slices in the microwave for 15-20 seconds.
9. What if my batter is too thick or the top cracks?
If the batter feels too thick, add a splash of milk or water to loosen it. If the top cracks, cover with foil and bake a bit longer.
10. Why is cooling important before slicing?
Always let the bread cool for at least 15 minutes before slicing. It helps set the crumb and prevents squishy slices. Slice with a serrated knife for cleaner cuts.
Baking this bread feels like reclaiming a moment of simplicity in a busy life. The warm aroma of bananas and toasted oats lingering in the air makes every slice feel special, even if it’s just for a quick breakfast or afternoon snack.
There’s a quiet satisfaction in turning overripe bananas into something nourishing and comforting. It’s a humble recipe that reminds me how small acts—like baking—can bring a little bit of calm and a lot of flavor.

Hi, I’m Ava Bennett. Welcome to Glowing With Pride. I’m Ava Bennett, a professional chef, recipe developer, and lifelong believer that food is one of the most powerful ways we express love, identity, and joy. This space was created from years of working in professional kitchens, countless late nights behind the line, and a deep desire to share food in a way that feels personal, proud, and purposeful. Cooking has never just been my career. It has been my language.
Leave a Reply