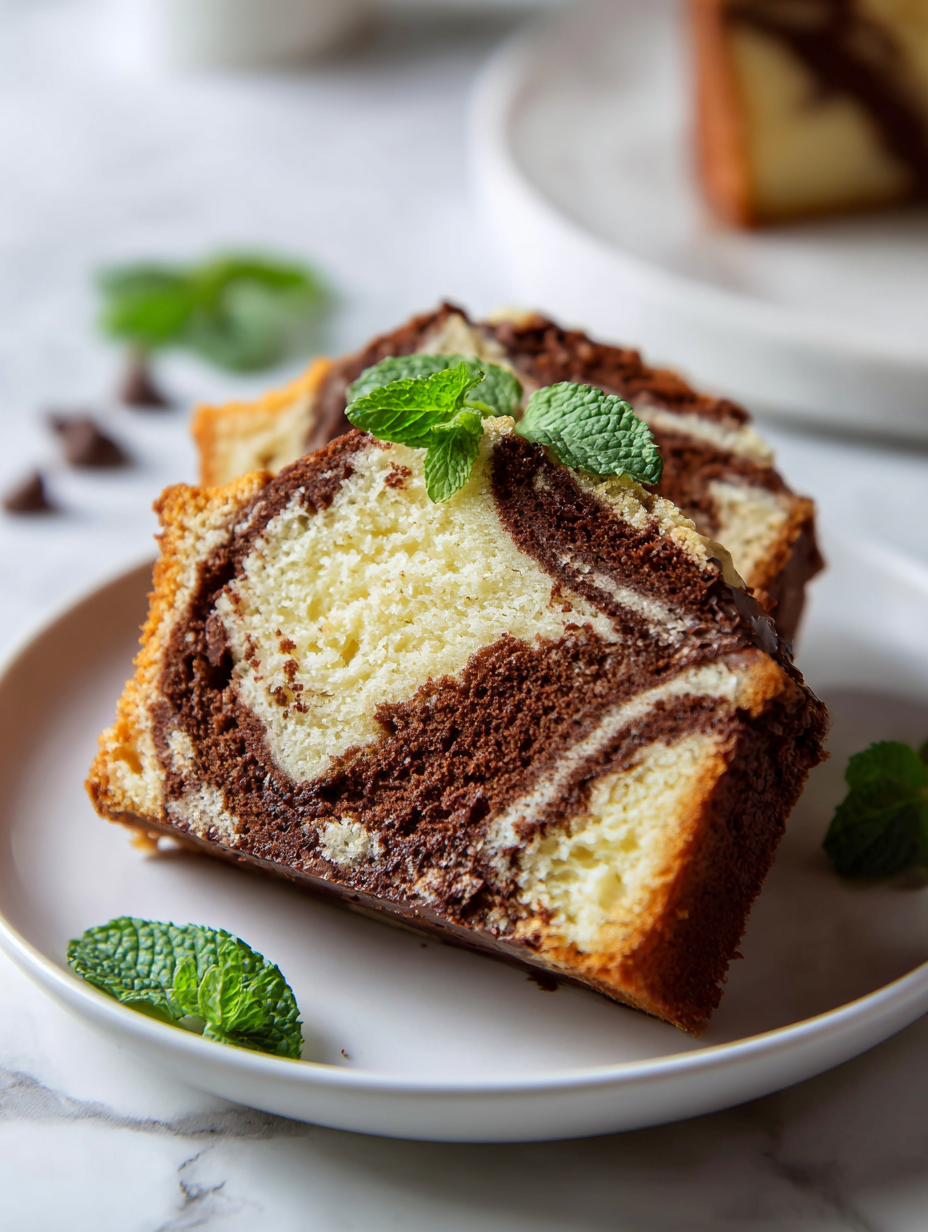
Marble pound cake might look fancy, but it’s really just a matter of a little swirl and patience. When you slice into it, those dark and light streaks aren’t just pretty—they tell a story of two batters meeting in harmony. It’s like eating a visual joke, where the surprise is in every bite.
I’ve always loved how this cake feels like a little bit of chaos turned beautiful. The way the dark cocoa ribbons mingle with the buttery vanilla base makes each slice feel special, almost like a tiny piece of edible art. Plus, it’s forgiving enough to tweak—more cocoa here, a dash of espresso there—and still turn out stunning.
Focusing on the visual and textural contrast in marble pound cake, I see it as a culinary canvas—each slice revealing swirling patterns that tell a story of the mixing process. This isn’t just about flavor; it’s about the joy of unwrapping a layered surprise, where the aesthetic elevates the simple act of baking into an artful experience. It’s a reminder that beauty and comfort can be baked into every crumb.
A Visual Feast in Every Slice
- Seeing the marbled swirl come together feels like watching a secret unfold in the oven.
- Baking this cake always takes me back to my grandma’s kitchen, where simple ingredients created something magical.
- The contrast in textures—crisp edges with a tender crumb—makes each bite a little adventure.
- There’s a quiet pride in pulling a perfectly swirled slice from the pan, knowing I crafted something beautiful.
The story behind this recipe
- Baking this marble pound cake always feels like a quiet act of rebellion against the uniform. I love watching the swirling dark cocoa and vanilla batter meet, creating those random, beautiful ribbons. It’s a bit messy—kind of like life—and that’s what makes it satisfying. Each slice is a little surprise, a reminder that beauty often comes from chaos.
- This recipe came from a moment of craving something rich but with a visual twist. I wanted a cake that looked as good as it tasted, something that made the act of slicing feel special. Over the years, I’ve tweaked the proportions, but the core idea—marbling for the visual—has stuck. It’s become my go-to for gatherings that deserve a little show-stopping moment.
- heading:
Trivia and Historical Notes
- Marble pound cake’s swirling pattern is believed to have originated in European baking traditions, where visual appeal was as important as flavor.
- The technique of marbling batter dates back to the 18th century, inspired by artistic marbling paper and fabrics popular in that era.
- In some regions, marble cakes are associated with festive occasions, symbolizing unity and harmony through their contrasting yet intertwined layers.
Ingredient breakdown: key components
- Butter: I use salted butter for richness, but if you prefer a milder taste, go for unsalted. The aroma when it melts is buttery and inviting—swap with margarine if needed, but the flavor won’t be quite the same.
- Flour: I opt for all-purpose flour, sifted well to keep the batter light. Whole wheat flour can work in a pinch, but it adds a denser crumb and a nuttier flavor that changes the vibe.
- Cocoa powder: I love Dutch-processed cocoa—it’s smooth and deep, giving the marbled streaks a rich, smoky note. Natural cocoa can be a bit more acidic, so adjust the sugar if you swap.
- Sugar: Granulated sugar keeps it simple and sweet, but brown sugar adds a caramel undertone that makes the swirl feel even more decadent. Adjust the sweetness accordingly.
- Eggs: I use large eggs for structure and moisture. For a richer crumb, a splash of sour cream can boost the tenderness without changing the flavor much.
- Vanilla extract: Pure vanilla adds warmth and depth. If you only have imitation, the cake still tastes good, but it loses that layered aroma. A splash of almond extract can add a subtle twist.
- Milk: Whole milk keeps the batter moist and tender. Skim milk will work, but the cake might be slightly drier. A splash of espresso can deepen the chocolate flavor if you like.
Spotlight on key ingredients
Cocoa powder:
- Butter: I use salted butter for richness, but if you prefer a milder taste, go for unsalted. The aroma when it melts is buttery and inviting—swap with margarine if needed, but the flavor won’t be quite the same.
- Flour: I opt for all-purpose flour, sifted well to keep the batter light. Whole wheat flour can work in a pinch, but it adds a denser crumb and a nuttier flavor that changes the vibe.
- I love Dutch-processed cocoa—it’s smooth and deep, giving the marbled streaks a rich, smoky note. Natural cocoa can be a bit more acidic, so adjust the sugar if you swap.
Sugar & Eggs:
- Vanilla extract: Pure vanilla adds warmth and depth. If you only have imitation, the cake still tastes good, but it loses that layered aroma. A splash of almond extract can add a subtle twist.
- Eggs: I use large eggs for structure and moisture. For a richer crumb, a splash of sour cream can boost the tenderness without changing the flavor much.
- Sugar: Granulated sugar keeps it simple and sweet, but brown sugar adds a caramel undertone that makes the swirl feel even more decadent. Adjust the sweetness accordingly.
Notes for ingredient swaps
- Butter: I use salted butter for richness, but if you prefer a milder taste, go for unsalted. The aroma when it melts is buttery and inviting—swap with margarine if needed, but the flavor won’t be quite the same.
- Flour: I opt for all-purpose flour, sifted well to keep the batter light. Whole wheat flour can work in a pinch, but it adds a denser crumb and a nuttier flavor that changes the vibe.
- Cocoa powder: I love Dutch-processed cocoa—it’s smooth and deep, giving the marbled streaks a rich, smoky note. Natural cocoa can be a bit more acidic, so adjust the sugar if you swap.
- Sugar: Granulated sugar keeps it simple and sweet, but brown sugar adds a caramel undertone that makes the swirl feel even more decadent. Adjust the sweetness accordingly.
- Eggs: I use large eggs for structure and moisture. For a richer crumb, a splash of sour cream can boost the tenderness without changing the flavor much.
- Vanilla extract: Pure vanilla adds warmth and depth. If you only have imitation, the cake still tastes good, but it loses that layered aroma. A splash of almond extract can add a subtle twist.
- Milk: Whole milk keeps the batter moist and tender. Skim milk will work, but the cake might be slightly drier. A splash of espresso can deepen the chocolate flavor if you like.
Equipment & Tools
- Loaf pan: Holds the batter during baking
- Mixing bowls: Combine ingredients and divide batter
- Electric mixer: Cream butter and sugar, aerate batter
- Rubber spatula: Fold in ingredients and swirl batter
- Toothpick or skewer: Create marbled pattern and check doneness
- Cooling rack: Cool cake evenly and prevent sogginess
Step-by-step guide to marble pound cake
- Preheat your oven to 180°C (350°F). Grease a 9×5 inch loaf pan and line it with parchment paper. Have your ingredients measured and ready; this batter comes together quickly.
- In a large bowl, cream 1 cup (226g) of softened butter with 1 1/2 cups (300g) sugar until pale and fluffy, about 3-4 minutes. Use a hand or stand mixer on medium speed. Scrape down the sides as needed.
- Add 4 large eggs, one at a time, beating well after each addition. The batter might look a bit curdled—that’s okay, it will smooth out later.
- Stir in 2 teaspoons vanilla extract. In a separate bowl, sift 2 1/2 cups (310g) all-purpose flour with 1 teaspoon baking powder and 1/2 teaspoon salt. Gradually add dry ingredients to the wet, alternating with 1/2 cup (120ml) milk, beginning and ending with flour. Mix just until combined.
- Divide the batter evenly into two bowls. In one, fold in 1/4 cup (25g) Dutch-processed cocoa powder; stir until smooth. This is your dark batter for the swirl.
- Drop dollops of vanilla and chocolate batters into the prepared loaf pan, alternating. Use a skewer or knife to gently swirl the two batters, creating a marbled pattern. Don’t overmix; keep the swirl loose and natural.
- Bake on the center rack for 50-55 minutes. Check for doneness by inserting a toothpick into the center—it should come out with a few moist crumbs, not wet batter.
- If the top browns too quickly, tent with foil after 30 minutes. Keep an eye on the edges—they should be golden and slightly pulled away from the pan.
- Once baked, remove from the oven and let the cake sit in the pan for 15 minutes. Then, transfer to a wire rack to cool completely. The aroma of buttery vanilla and cocoa should fill your kitchen.
- Allow the cake to cool completely before slicing. Use a serrated knife for clean cuts, revealing the beautiful marble pattern inside.
Let the cake cool completely on a wire rack before slicing. This prevents crumbling and ensures clean, sharp marbled lines. Slice with a serrated knife for the best reveal of the swirl pattern. Serve at room temperature, maybe with a dusting of powdered sugar or a smear of jam if feeling fancy.
How to Know It’s Done
- Cake is golden and pulls away slightly from the pan edges.
- Toothpick inserted in the center comes out with moist crumbs, not batter.
- The top feels firm and springy when lightly pressed.
Marble Pound Cake
Ingredients
Equipment
Method
- Preheat your oven to 180°C (350°F). Grease a loaf pan and line it with parchment paper for easy removal.
- In a large mixing bowl, cream together the softened butter and sugar using an electric mixer until the mixture is pale, fluffy, and fragrant—about 3-4 minutes. This creates a smooth, airy base.
- Add eggs one at a time, beating well after each addition. The batter may look a little curdled, but that’s normal and will come together in the next steps.
- Stir in the vanilla extract. In a separate bowl, whisk together the sifted flour, baking powder, and salt.
- Gradually add the dry ingredients to the wet mixture, alternating with the milk. Mix on low speed just until combined, being careful not to overmix.
- Divide the batter evenly into two bowls. In one, fold in the cocoa powder until smooth—this will be your chocolate batter for swirling.
- Drop spoonfuls of vanilla and chocolate batters into the prepared loaf pan, alternating between the two. Use a toothpick or skewer to gently swirl through the batters, creating a marbled pattern—don’t overmix, keep it loose.
- Bake in the preheated oven for about 50-55 minutes. Check doneness by inserting a toothpick into the center—the cake is ready when it comes out with moist crumbs and the top is golden.
- Remove the cake from the oven and let it cool in the pan for 15 minutes. Then, transfer it to a wire rack to cool completely—this helps set the pattern and prevents sogginess.
- Once cooled, slice the cake with a serrated knife to reveal the beautiful marbled pattern inside. Serve at room temperature and enjoy the tender crumb and striking visual contrast.
Tips & Tricks for Perfect Marble Cake
- Bolded tip: Use room temperature eggs and butter for smoother mixing and even batter texture.
- Bolded tip: Swirl the batters gently—overmixing destroys the marbled effect and can make the cake dense.
- Bolded tip: Tap the pan on the counter before baking to release any air bubbles and settle the batter.
- Bolded tip: Keep an eye on the edges during baking; if they brown too quickly, tent with foil to prevent over-torching.
- Bolded tip: Use a skewer or toothpick to create a loose swirl—don’t overdo it, or the marbling will blur together.
- Bolded tip: Check doneness by inserting a toothpick; moist crumbs mean it’s ready, avoid overbaking to keep it tender.
- Bolded tip: Cool the cake completely on a rack before slicing to keep the pattern sharp and avoid crumbling.
Common Marble Cake Mistakes & Fixes
- FORGOT to preheat the oven → Always preheat before mixing batter.
- DUMPED batter into pan too quickly → Pour gently to avoid disturbing swirls.
- OVER-TORCHED the top → Tent with foil if edges brown too fast.
- MISSED the toothpick test → Insert in center; moist crumbs mean done.
Quick Fixes for Marble Pound Cake
- When batter looks too thick → Splash in a little more milk for a smoother swirl.
- If the marbling disappears → Use a skewer to gently re-swirl before baking.
- Splash a bit of vanilla or coffee extract if flavor feels dull after baking.
- Patch cracks by pressing a tiny bit of batter into the surface and baking a few minutes more.
- Shield edges with foil if they start browning too fast—keep that shimmer in the middle.
Prep, store, and reheat tips
- Prep the batter and swirl it in the pan up to a day ahead; keep covered in the fridge to preserve freshness.
- Store cooled cake tightly wrapped in plastic or in an airtight container at room temperature for up to 2 days—don’t forget that buttery aroma is best fresh.
- For longer storage, slice the cake and freeze in an airtight container or wrap slices individually; they’ll keep for up to 3 months, with flavors mellowing slightly after freezing.
- Reheat slices gently in the microwave for about 10-15 seconds until just warm—look for a soft, fragrant crumb that’s not dry. Oven reheats at 150°C (300°F) for 10 minutes if you want crispy edges again.
- To refresh the marbled appearance after storage, briefly warm the cake and gently swirl with a skewer before serving. The aroma of cocoa and vanilla should waft up invitingly.
Top questions about marble pound cake
1. How do I know when the cake is cooked?
Look for a toothpick inserted in the center—if it comes out with moist crumbs, it’s done. The cake should feel springy and look golden on top.
2. Can I make this batter ahead of time?
Use room temperature eggs and butter—they blend more smoothly, creating a tender crumb and even marbling. Cold ingredients can cause lumps or uneven swirls.
3. Can I refrigerate the batter overnight?
Absolutely, you can prepare the batter and swirl in the pan a day before baking. Cover tightly and refrigerate; bring to room temp before baking for best results.
4. Will the swirl stay intact after refrigeration?
Yes, but keep it covered in the fridge. The batter might thicken slightly overnight. Let it sit at room temp for 30 minutes before baking to loosen it up.
5. How long should I bake the cake?
To prevent overbaking, start checking around the 50-minute mark. The edges should be golden and pulling slightly away from the pan, and a toothpick should come out with moist crumbs.
6. Which cocoa powder is best for marbling?
Use Dutch-processed cocoa for a smooth, rich swirl with smoky notes. For a brighter flavor, natural cocoa works but may alter the color and acidity; adjust sugar slightly if you swap.
7. How should I slice the cake?
A serrated knife works best for slices—gentle sawing prevents tearing. Let the cake cool completely to keep the pattern sharp and avoid crumbling.
8. How do I store marble pound cake?
Store cooled cake in an airtight container at room temperature for up to 2 days. For longer, wrap slices individually and freeze for up to 3 months, reheating briefly before serving.
9. What if my batter is too thick?
When the batter is too thick to swirl easily, add a splash of milk—just enough to loosen it without making it runny. It should be soft but scoopable.
10. My marbling looks dull—what now?
If the marbling disappears during baking, gently swirl the batter again with a skewer before baking. For cracks, press in a little extra batter and bake a few more minutes.
This marble pound cake feels like a little act of rebellion—seeing that swirl come apart in perfect contrast. It’s a reminder that beauty and chaos can meet in one simple slice, right from your own oven.
Baking it is a quiet celebration of the visual and textural surprises that make home baking so satisfying. No matter how many times you make it, each slice still feels like uncovering a secret—rich, tender, and full of contrast, just like life.

Hi, I’m Ava Bennett. Welcome to Glowing With Pride. I’m Ava Bennett, a professional chef, recipe developer, and lifelong believer that food is one of the most powerful ways we express love, identity, and joy. This space was created from years of working in professional kitchens, countless late nights behind the line, and a deep desire to share food in a way that feels personal, proud, and purposeful. Cooking has never just been my career. It has been my language.
Leave a Reply