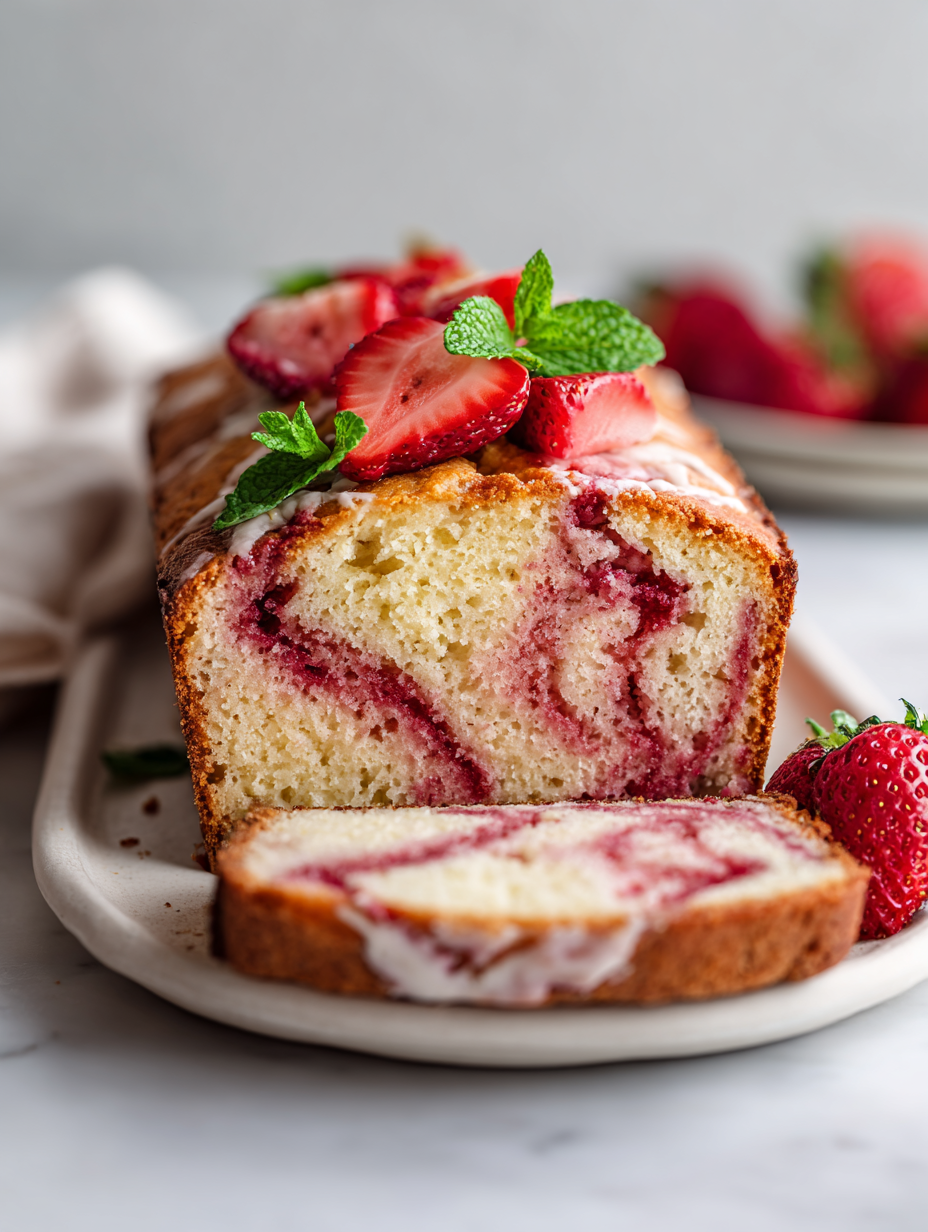
This strawberry yogurt loaf is my go-to for a lively breakfast or brunch. It’s like starting the day with a burst of fresh berries and a whisper of tangy yogurt in every slice. Honestly, it’s so easy to whip up on a weekend when you want something that feels special but is still practical.
What makes this loaf stand out is how the strawberries add a juicy sweetness that contrasts beautifully with the creamy yogurt. I love how it’s not overly sweet, making it perfect for mornings when you need a little bright energy without feeling weighed down. Plus, it’s a great way to use up those ripe berries that might be a little too soft for snacking.
Focusing on how this strawberry yogurt loaf can serve as a lively breakfast or brunch treat, blending the freshness of berries with the creamy tang of yogurt to start the day with a bit of joy.
Bright mornings with berry bursts
- Baking this loaf always reminds me of lazy weekend mornings filled with the smell of ripe strawberries and warm batter, a little chaotic but utterly comforting.
- There’s a quiet pride I feel when I slice into this and see the bright pink swirls of fruit and yogurt—like a little edible artwork I made myself.
- I love how this loaf brings a burst of sunshine to my table, especially on days when I need a reminder that simple pleasures can be so satisfying.
- Sometimes I add a handful of chopped almonds just before baking, and that crunch makes me smile every time, a tiny twist I can’t resist.
The story behind this recipe
- This recipe came about after a summer trip to a farm stand where I picked a basket of perfectly ripe strawberries. I wanted to capture that fleeting freshness in a way that felt cozy and not overly fussy—something I could whip up on a lazy weekend with ingredients I already had lying around.
- The idea of blending yogurt into the loaf came from my obsession with quick, moist baked goods that feel almost like a breakfast snack. I love how the tangy yogurt keeps the crumb tender and adds a subtle depth to the sweetness of the berries.
- Over the years, I’ve tweaked this recipe to include a splash of vanilla and a sprinkle of sugar on top before baking—those little touches make a noticeable difference, turning a simple loaf into a small celebration of strawberries and tang.
Contextual origin, trivia, or history
- This loaf is inspired by the traditional quickbreads of the Midwest, where berries and dairy were staples for hearty, simple breakfasts.
- Historically, yogurt has been used in baked goods across various cultures—adding moisture and a tang that balances sweetness.
- Strawberry and yogurt pairings date back to 19th-century European desserts, where fresh fruit and dairy were luxuries for home bakers.
Key ingredients and tips
- Strawberries: I love how ripe, juicy strawberries burst with flavor—look for deep red, shiny berries for the best sweetness. Swap with raspberries if you prefer a tangier note.
- Greek Yogurt: Its creamy tang keeps the loaf moist and tender—use full-fat for richness, or a plant-based yogurt for dairy-free comfort. The tang is a real highlight, so don’t skimp on quality.
- All-Purpose Flour: The backbone of the loaf—if you want a slightly denser crumb, try bread flour, but all-purpose keeps it tender and light. Sift if you notice lumps.
- Sugar: Just enough to balance the berries’ tartness—brown sugar adds a caramel note, while honey can bring a floral sweetness. Adjust based on your berry’s ripeness.
- Baking Powder: Leavens the batter, giving it a light, airy texture—don’t forget to check its freshness, or the loaf might be denser than desired.
- Eggs: They bind everything together and give structure—use large eggs. For vegan tweaks, try flax eggs, but expect a slightly different crumb.
- Vanilla Extract: Enhances the berry flavor with a warm depth—if you don’t have vanilla, a splash of almond extract can add a lovely twist.
Spotlight on key ingredients
Strawberries:
- I love how ripe, juicy strawberries burst with flavor—look for deep red, shiny berries for the best sweetness. Swap with raspberries if you prefer a tangier note.
- Greek Yogurt: Its creamy tang keeps the loaf moist and tender—use full-fat for richness, or a plant-based yogurt for dairy-free comfort. The tang is a real highlight, so don’t skimp on quality.
Greek Yogurt:
- Its tangy, creamy texture is what keeps this loaf moist and tender. Use full-fat for richness or plant-based for dairy-free options. The slight tang really elevates the flavor, so choose a good quality yogurt.
- The yogurt’s acidity reacts with the baking powder, helping the loaf rise and giving it a tender crumb. It also adds a subtle tang that balances the sweetness of the berries, making every bite lively and fresh.
Notes for ingredient swaps
- Dairy-Free: Swap Greek yogurt for coconut or almond yogurt. It keeps the loaf moist but adds a slightly different tang.
- Sugar Alternatives: Use honey, maple syrup, or agave nectar instead of granulated sugar. Adjust the liquid content slightly to compensate.
- Flour Choices: Replace all-purpose flour with whole wheat or spelt flour for a nuttier flavor and denser crumb, but reduce the liquid slightly.
- Berry Variations: Blueberries or raspberries can replace strawberries. Raspberries add a more tart punch, while blueberries are milder.
- Sweetener Boost: Add a tablespoon of lemon zest or vanilla extract for extra flavor without altering the texture.
- Oil Instead of Butter: Use vegetable oil or melted coconut oil if you want a softer crumb, especially if avoiding dairy butter.
- Egg-Free: Replace eggs with flax eggs (1 tablespoon ground flaxseed + 3 tablespoons water per egg) for a vegan-friendly loaf.
Equipment & Tools
- Loaf pan: Holds the batter while baking, ensuring a uniform shape.
- Mixing bowls: Separate dry and wet ingredients for even mixing.
- Whisk: Combine ingredients smoothly and aerate the batter.
- Spatula: Gently fold ingredients without deflating the batter.
- Toothpick or cake tester: Test for doneness by checking the center.
- Cooling rack: Allow air circulation for even cooling and prevent sogginess.
Step-by-step guide to strawberry yogurt loaf
- Preheat your oven to 180°C (350°F). Grease a standard 9×5-inch loaf pan with butter or non-stick spray and line with parchment paper for easy removal.
- In a large bowl, whisk together 1 1/2 cups (190g) all-purpose flour, 1 teaspoon baking powder, and a pinch of salt. Set aside.
- In a separate bowl, combine 3/4 cup (150g) granulated sugar and 1/2 cup (120g) Greek yogurt. Mix until smooth and slightly fluffy, about 2 minutes.
- Add 2 large eggs to the yogurt mixture, one at a time, whisking well after each addition. Then stir in 1 teaspoon vanilla extract.
- Gently fold in 1 cup (150g) chopped strawberries, trying not to crush them. The berries should be evenly distributed but not overly mashed.
- Pour the wet ingredients into the dry ingredients. Mix gently with a spatula until just combined—don’t overmix, or the loaf could get dense.
- Transfer the batter to your prepared loaf pan, smoothing the top with the back of a spoon or spatula. Sprinkle a little extra sugar on top if desired.
- Bake for 50-60 minutes. The loaf is done when the top is golden brown and a toothpick inserted into the center comes out clean. Check around 50 minutes, as oven times vary.
- If the top browns too quickly but the center isn’t done, tent with foil and continue baking. The loaf should smell fragrant and slightly toasted around the edges.
- Remove from the oven and let it cool in the pan for about 15 minutes. Then transfer to a wire rack and let cool completely before slicing.
- For best flavor, let the loaf rest at least 30 minutes; this allows the crumbs to set, making slices cleaner and more tender.
- Slice with a serrated knife, revealing the vibrant strawberry swirls. Serve slightly warm or at room temperature, maybe with a dollop of yogurt or fresh berries.
Let the loaf rest on a wire rack for at least 30 minutes. Slice gently with a serrated knife to reveal the berry swirls. Serve at room temperature or slightly warmed, perhaps with a dusting of powdered sugar or a smear of yogurt for extra indulgence.
How to Know It’s Done
- Golden brown top with visible strawberry bits.
- Toothpick inserted in center comes out clean.
- Loaf feels firm but springy when lightly pressed.
Strawberry Yogurt Loaf
Ingredients
Equipment
Method
- Preheat your oven to 180°C (350°F). Grease a 9×5-inch loaf pan and line it with parchment paper for easy removal. Gather your ingredients so everything is ready to go.
- In a large mixing bowl, whisk together the all-purpose flour, baking powder, and salt until evenly combined. This ensures a light, airy crumb.
- In a separate bowl, stir together the granulated sugar and Greek yogurt until smooth and slightly fluffy. This forms the tangy base of your batter.
- Add the eggs one at a time to the yogurt mixture, whisking well after each addition. Then stir in the vanilla extract for warmth and depth of flavor.
- Gently fold the wet mixture into the dry ingredients using a spatula, mixing just until combined. Be careful not to overmix to keep the loaf tender.
- Carefully fold in the chopped strawberries, distributing them evenly throughout the batter. The pink streaks and juicy bits should be visible but not mashed.
- Pour the batter into your prepared loaf pan, smoothing the top with a spatula. If desired, sprinkle a little extra sugar on top for a sweet, crunchy crust.
- Bake in the preheated oven for about 50-55 minutes, or until the top is golden brown and a toothpick inserted into the center comes out clean. Use the toothpick test to check doneness.
- If the loaf starts to brown too quickly but isn’t fully baked, tent it loosely with foil and continue baking. This preserves the moist interior without burning the crust.
- Remove the loaf from the oven and let it cool in the pan for about 15 minutes. Then transfer it to a wire rack to cool completely, which helps set the crumb and makes slicing easier.
- Once cooled, slice the loaf with a serrated knife, revealing the vibrant pink swirls and juicy strawberries. Serve at room temperature or slightly warmed for the best flavor.
Pro tips for perfect strawberry loaf
- Gentle folding: Use a spatula to fold in strawberries—avoid smashing them to keep the pieces intact and vibrant.
- Room temperature ingredients: Let eggs and yogurt sit out 15 minutes before mixing for a smoother batter and even rise.
- Berry distribution: Toss chopped strawberries in a little flour before folding—prevents them from sinking to the bottom during baking.
- Oven placement: Bake on the middle rack for even heat circulation, avoiding hot spots that can burn the top.
- Check for doneness: Insert a toothpick—if it comes out with moist crumbs, it’s ready. Slightly moist is okay; avoid overbaking.
- Cooling time: Cool the loaf in the pan for 15 minutes, then transfer to a wire rack—this prevents sogginess and sets the crumb.
- Sugar sprinkle: Before baking, sprinkle a little extra sugar on top for a subtle crunch and a sweet, shiny crust.
Common mistakes and how to fix them
- FORGOT to check oven temperature → calibrate oven for even baking.
- DUMPED in all berries at once → fold gently to avoid bleeding juice.
- OVER-TORCHED the loaf top → tent with foil after 40 minutes if browning too fast.
- MISSED the cooling step → cool completely for neater slices and better texture.
Quick fixes and pantry swaps
- When berries sink, fold in a little flour first to suspend them evenly.
- Splash a teaspoon of lemon juice into the batter for extra brightness if strawberries are bland.
- Patch a cracked loaf with a smear of batter before baking to prevent crumbling.
- DUMPED in too much juice from berries? Drain briefly or toss berries in flour to absorb excess moisture.
- Shield the top with foil if it browns too quickly, preserving the moist crumb inside.
Prep, store, and reheat tips
- Prepare the batter up to a day in advance; keep refrigerated in an airtight container for a fresh, tangy flavor.
- Wrap cooled loaf tightly with plastic wrap or store in an airtight container; it stays moist and flavorful for up to 2 days at room temperature.
- For longer storage, freeze slices in a zip-top bag for up to 1 month; reheat gently in the microwave until just warm, watching for steam and softness.
- Reheating the loaf releases a comforting aroma and restores some moisture—try a quick 15-20 second blast in the microwave, or warm in a low oven (around 150°C/300°F) for 10 minutes.
- Note that freezing can dull the fresh berry brightness slightly, but the yogurt keeps the crumb tender and moist after thawing.
Frequently Asked Questions
1. What kind of strawberries work best?
Use ripe strawberries that are shiny and deep red, for the sweetest flavor. If you want a tangier loaf, swap with raspberries.
2. Can I use a different yogurt?
Greek yogurt adds moisture and a slight tang—full-fat makes it richer, but plant-based yogurts work too. The tang balances the berries’ sweetness.
3. Can I swap the flour?
Yes, you can substitute with whole wheat or spelt flour for a denser crumb. Sift it to avoid lumps and keep it tender.
4. What about using honey or syrup?
Use honey, maple syrup, or agave instead of sugar. Adjust the liquid slightly if needed, as these add moisture and sweetness.
5. Is there a vegan option?
You can replace eggs with flax eggs (1 tbsp ground flaxseed + 3 tbsp water). It works well for vegan baking, though the texture is slightly different.
6. How do I know when it’s done?
Bake until the top is golden, a toothpick comes out clean, and the loaf feels firm but springy. Let it cool before slicing.
7. How should I store leftovers?
Wrap cooled loaf tightly and store at room temp for 1-2 days, or freeze slices for up to a month. Reheat gently to enjoy fresh flavor.
8. How do I prevent berries from sinking?
When berries sink, toss them in a little flour before folding in. To prevent over-browning, tent the loaf with foil after 40 minutes.
9. How do I get neat slices?
Use a serrated knife to slice for clean cuts. If the loaf cracks, let it rest a bit longer before slicing.
10. Any quick flavor boosts I can try?
Add a splash of lemon juice to brighten flavors if strawberries are bland. For extra richness, sprinkle sugar on top before baking.
Baking this loaf on a lazy weekend morning fills the kitchen with a sweet, fruity aroma that makes the whole house feel cozy. It’s a simple pleasure that reminds me how small acts—like mixing batter—can brighten an ordinary day.
Sharing a slice with someone you love brings a quiet moment of joy, especially when you see the streaks of pink strawberries and creamy yogurt inside. It’s not just about the taste, but the little ritual of creating something nourishing and familiar.

Hi, I’m Ava Bennett. Welcome to Glowing With Pride. I’m Ava Bennett, a professional chef, recipe developer, and lifelong believer that food is one of the most powerful ways we express love, identity, and joy. This space was created from years of working in professional kitchens, countless late nights behind the line, and a deep desire to share food in a way that feels personal, proud, and purposeful. Cooking has never just been my career. It has been my language.


Leave a Reply